Virtual hosting on Glassfish
June 27, 2009 6 Comments
Hi everyone,
I’ve been looking how to change the URL of a website I’m developping in JEE. You probably have noticed that the URL of the project You’re developping is something like : http://localhost:8080/theContextPathOfYourProject.
I’m currently developping my application with NetBeans and Glassfish V2 and I would like to change this URL with something more simple, like http://www.mysite.com/
So I checked out and a nice feature of Glassfish could be used : Virtual Hosting.
This article will show You how to do that, in the easiest way possible. So let’s go.
First of all, You’ll need to have a JEE application. With this application, You can change its context-path to something simple. For example, my application is named jacc so I changed its context-path to jacc. Do this is pretty simple.
In NetBeans, open the Projects window, right-click on Your application and choose Properties. In the new window, go to Run and change the context-path, as shown below :

After that, we’re going to work in the Administration console of Glassfish. So if Glassfish isn’t started yet, do it and go to the admin console.
Step 1:
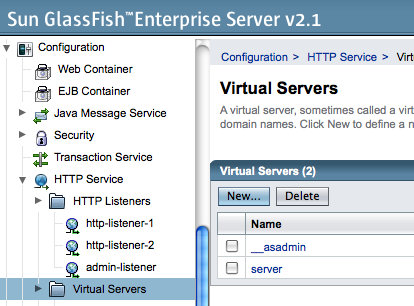
We will create a virtual server. So let’s go to Configuration, HTTP Service and Virtual Servers. You should be there :

Click on the New… button. Give an id (for example jacc), the hosts (which corresponds to the address You’ll enter in Your browser to access Your website : I want jacc.com). Hit the OK button. We’ll create a listener and then, go back here.
Step 2 :
Here we will create a listener. This listener will listen requests on a given port. The default port Glassfish is listen to is 8080. If You don’t want to run Your app on another port, You can go to step 3. Otherwise, let’s go.
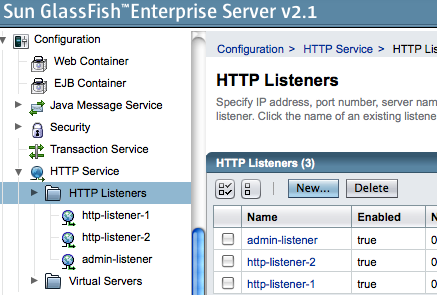
We’re going to create a listener for the port 8282. On the left of the admin console, click on Configuration, then HTTP Service and HTTP Listeners. You should be there :

Right, click on the New… button. Give Your listener a name such as http-listener-3, the network address (in our case, for localhost, we enter 0.0.0.0), the listening port (8282 as we said) and the default virtual server, created before. So in the list You should see jacc. If not, restart Glassfish and restart this step. Hit Next and the Finish.
Step 3:
Then go back to the virtul servers list and click on the one You’ve created before. And in the text field for the HTTP Listners, enter the name of the listener You’ve created before. For me http-listener-3.
Then, in the list of Default Web Module, You will choose Your web application. Mine is called jAcc-war. So I select it. With that, You won’t need to type the context path of Your application in the URL 🙂
Ok, should be nice. Now, we have to indicates Glassfish our web application will run on our brand new virtual server.
Step 4:
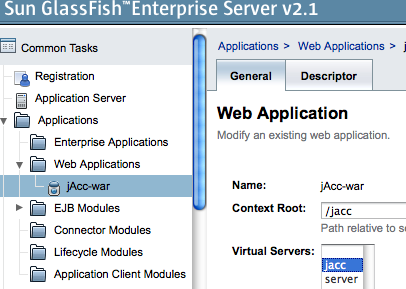
So, go to Applications, Web Applications and select Your application. Mine is jAcc-war. Then select Your virtual server in the list like this :

So now, restart Your Glassfish. Then we’re going to work somewhere else…
Step 5:
When You type the hosts address You defined in the creation of Your virtual server (jacc.com for me) in the address bar of Your browser, it shouldn’t go to the right place… So You have to tell Your computer that this host is Your computer. So find a file named hosts in Your system. In Unix based OS, it should be in /etc/. On Windows system : C:\WINDOWS\system32\drivers\etc. Edit this file and add a line like this :
127.0.0.1 jacc.com
Well, now it should work 🙂 So in Your brower, You should type the URL You wanted and the port on which Your virtual server listens. So for me jacc.com:8282
So it is more convenient, isn’t it? 🙂
So now You know how to deploy virtual servers using Glassfish.
Enjoy 🙂

Pingback: Virtual hosting on Glassfish « Thierry WASYL : Sun and Java blog | The Web Hostings
Great. Thanks for Step 5. I was trying for an hour!
Thank you !
I’ve been looking for this 🙂
Thank you for this tutorial. in my case i can’t figure out how to make it run.
let’s say my domain name is: http://www.domain.com (which is mapped to an IP xxx.xx.xx.xx on port 80). how can i type this domain name: http://www.domain.com and let glassfish load the application at http://www.domain.com:8080 but without the :8080 part?
i tried your solution of virtual host, but it still requires :8080. Should i need to do sthg else since in my case it is not localhost?
thanks a lot
Hi there.
Indeed you will always need to specify the port in your URL by default. What you can do is set your app as default project so you won’t need to enter the context-path of your app in the address bar. Concerning the port part, it’s more a server/router configuration. Indeed, you can create a rule in your router that every request is forwarded to the 8080 port.
Hope it helps
Go to your glassfish domain.xml file and change all 28080 to 280